Back in 2010, I made a little post about my Acorn A7000+, where I mentioned my past experiences with the machine and its OS.
The other day, I thought to myself that I should get it down and get it powered on again in order to try some things out with DNS. Before pumping mains electricity through it, I thought it would be a great idea for me to take a look inside it because it hadn't been powered on for about four years.
And I am glad I did.
During that four year break, the CMOS battery attached to the board decided to leak and its contents were deposited on the board itself. This requires me to replace the battery and repair the damaged area, This is the story of how I achieved this.
The A7000 and the A7000+ are very compact machines for their period. Despite the outward appearance of the case, which is only really that large due to Acorn recognising that a CD drive would be used at some point, the system itself is quite small and has a remarkably low profile. I am not sure if Acorn had different hardware options in mind when they designed the board etc, but I do know that this design made its way in to a lot of set top boxes.
The low profile is achieved, in part, due to the use of passive cooling - no heatsink or fan is on the CPU here, which is in stark contrast to the time in which this article was written. At the present time, heatsinks and fans can be quite large, and water cooling solutions are becoming more popular. When this machine was made, not having a fan was still something that happened - but more and more systems were getting fans installed at the factory.
The CPU in the A7000+, the machine I have, is probably better being described as being an SoC. I found the datasheet for it here. The main areas it controls are as follows:

This makes the layout on the motherboard quite clean and uncluttered and allows for it to be as small as it is.
This model also provides two methods for expansion in the form of a backplane connector for a hardware format named "podule" by Acorn and a standard internal network connector that is compatible with past Archimedes models. Sadly, Acorn didn't think that networking was going to be such a big deal for their ecosystem, in my opinion, at least. I think it has always remained an after thought.
For the backplane connector, I dont really remember much being commercially available for it at the time. However, these days there are quite a lot of things that are available to buy or to build yourself, including USB interfaces and GoTek interfaces. Sadly, due to the design of the board, you cannot use a CD drive and the backplane interface at the same time. I think this was an oversight and the main reason why I didn't see many expansions for it. These machines were intended to be used in schools, and schools were always going to go for media rich CD ROM based software over an expansion card.
The network cards were useful though, a lot of them at the time supported both Ethernet and BNC, which was really useful. But they were expensive, and to the best of my knowledge still are. The one I have now is just Ethernet, but works perfectly well on my network.
As standard, the A7000+ came with 8MB of RAM from the factory soldered to the board. It also had one memory expansion slot for a SIMM - anyone remember them? They were the bane of PC owners lives, tantalising us with their ever lowering prices. Always knowing that we would have to buy two of them at a time. However, the A7000+ didn't have that drawback, you just needed one to increase the available memory, and could support up to 128 MB, it also supported EDO RAM as well as FPM. This was a pretty big deal back then, EDO was the fast RAM that the cool gamers would have in their systems.
When it came to storage, it came with a 3.5" floppy drive as standard - the mere thought of not having one of these was pure ridiculous, and an IDE hard disc. I think there were various SKU's offering different amounts of HDD space and expanded memory, as well as with a CD drive option. Mine had come from a school, and still has the factory HDD, but the CD drive currently installed is mine (it just happens to be the first ever CD burner I ever owned...). One of the interesting things about RISC OS, at least up to 4.02, is that you have to tell the OS if you have a particular type of drive installed. It doesnt seem to be able to auto-detect them in the same way that a lot of contemporary x86 based desktops would have been able to.
Other than the network port, the A7000+ also has one DB9 RS-232 serial port and one printer port. It also has a PS/2 port for the keyboard and mouse separately. Another one of the oddities with RISC OS is its dependency on having a three button mouse. Annoyingly, the context menu appears on a middle click in this OS as opposed to a right click in Windows. At the time, PS/2 mice with a scroll wheel were still not ubiquitous. Whilst we cannot imagine a mouse not having a wheel now, there were still a lot of places that didn't automatically get wheel mice as soon as they became available, these places include offices and schools who typically only replaced mice as they broke. So if you didn't have an Acorn mouse, or it broke and you couldn't get a replacement, you might have been in quite a pickle. It happened to me when I was testing the machine out later on.
One really quirky feature of RISC OS that, quite frankly, annoys me, is that you need to define a monitor configuration in order to take best advantage of its video capabilities. To this day, I am not really quite sure why you have to do this, naturally all of the relevant Acorn monitors are supported and I have seen them in action. So I know how wonderful the OS can look, and at the time this has to have been the best looking OS on the market. You do get a stock 640x480 mode, but you cant change any visual settings. So lets see if we can change that.
Back to the problem at hand, I need to deal with the battery and the damage it might have caused. Opening up the case reveals that the leak has been largely localised to one specific area, covering the case and the board. So I needed to dig the board out from there to start working on the problem. As this meant taking the whole machine apart, I decided to test out the PSU at the same time and replace a bunch of missing screws etc.
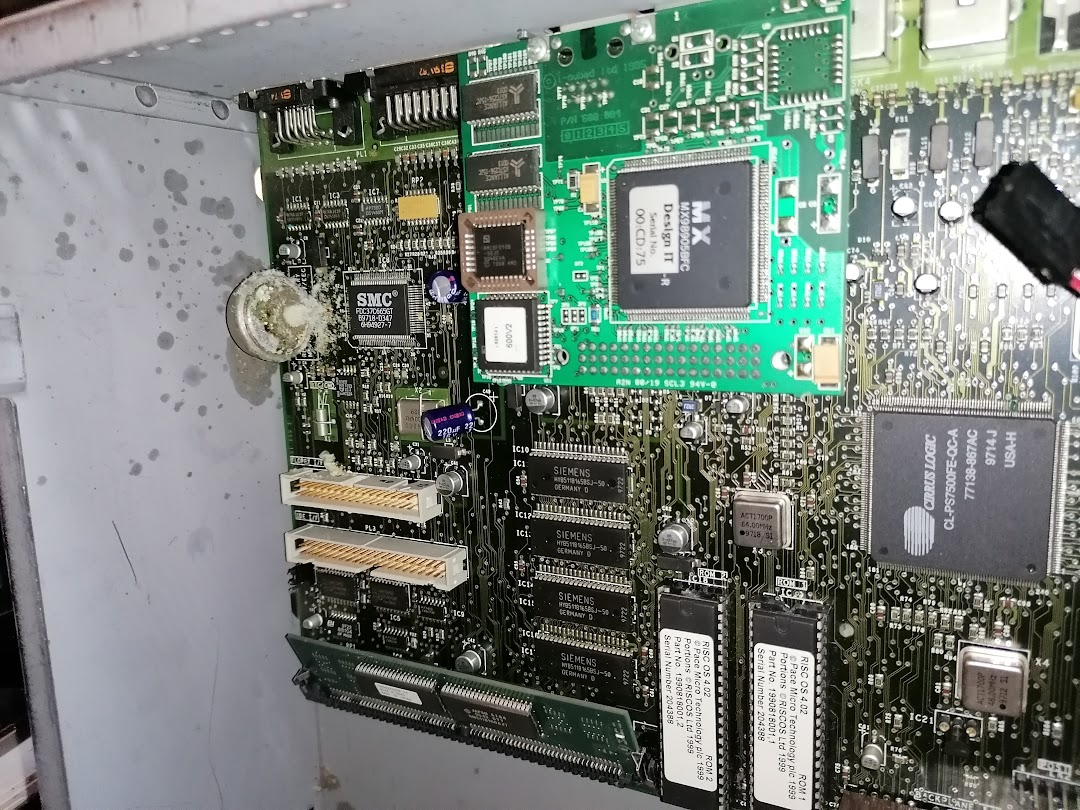
With the drive chassis and the drive cables removed, I was able to extract the motherboard from the case. As we are dealing with a battery leak, I am using white vinegar. According to Google and "people on Facebook", this neutralises the acid from the battery and stops further damage? I am willing to believe it without checking it for myself, you can almost see it working at times. I sprayed some vinegar on the effected area in the case and set it to one side whilst I took a look at the motherboard. You can see in the picture that it is localised to one specific area, which is really quite lucky. Also, you can see that the silicon looks amazing for a device this old. This specific area holds the CMOS memory and the Super IO controller for the floppy drive. The battery was here to provide power to the CMOS memory.

After looking at the affected area under a microscope, I realised that the damage may simply be superficial at this stage - which would be very lucky for me. So after carefully cleaning the area with some vinegar and a toothbrush, I was able to remove most of the gunk caused by the leaky battery. With that done, I was able to heat up the iron and remove the battery itself from the board.

I think the quality of the product helped a lot when it came to cleaning up the mess, that and being able to catch it at this stage. After cleaning up from the removal of the battery with some IPA I was left with a nice, clean set of holes for attaching a replacement. Looking at the battery itself, it looks as it one side of it failed, and its guts spilled out.


No comments:
Post a Comment