The other day I was talking to one of my friends about a drop in screen replacement kit I have for the Atari Lynx 2, something that I hope to cover in a future post, and mentioned how amazing that handheld was. I got around to showing some of the contemporary handhelds that were around at the time, including the Sega Game gear.
Sega were my all time favourite console makers, and when they backed out of the hardware business I almost cried. I have so many good childhood memories playing the Master System and Megadrive. I never had the chance to own a Game Gear back in the day, and to be honest I wasnt to bothered by that fact, I was never in the position where I would be on a long trip that would mean I needed to entertain myself by playing a video game for two hours. Plus, it was the 90's - you were supposed to annoy your parents back then :)
I have two of these devices, both are in pretty good condition for the age, however one of them got put away in its case with batteries still in its compartments, and I think anyone who has dealt with vintage electronics like this knows how bad this can be. So in this post, I am going to go through the process of taking a look at how bad this is and how I cleaned up the mess. Hopefully at the end, we will have a fully working Game Gear again.
This article is being written as I deal with the issue, so as I find things I will be documenting it with just some slight editing.
Getting straight into this, we can see from the rear that there is obviously a problem. The tell tale signs of battery leakage are present around the battery compartment doors. Normally when you see things like this, you need to think about how the corrosion has affected the circuit board close to the batteries, however for this device I know it was stored vertically. So there is a very good chance that there is no further internal damage. I will need to have a quick check anyway, just to be sure.

Opening both of the battery compartments reveals that four of the six batteries are leaking badly. It is a really good example of why you should use good quality batteries if you are going to leave them in a device for a long period. The Duracell batteries appear to be perfectly fine at this point, and the Hyundai are the ones that have failed. If I remember correctly, the Hyundai cells were the ones you could buy cheaply from Poundland at the time, you could get something like twenty of them at a time for just one pound.


We can see that there is some significant corrosion on the battery terminals, we have lost the springs on some of them, they have been left behind on the batteries that were removed. This happens from time to time in this type of situation. We can also see that some of the leakage has gone down through the battery compartment into the main housing of the device

For a comparison, this is what it should look like. The terminal springs on these devices are pretty large, I guess that needs to be the case as Sega assumed this would get quite a few bangs and knocks as it was being used and they didn't want six AA batteries getting loose easily. I am not sure what the foam padding is for, given that it is behind the battery compartment. But it could be the case that it is there to help when batteries leak? I guess we will find out when we get a look on the inside.

One bad thing I noticed is that there is corrosion around the headphone socket. This is at the top of the unit, and whilst I know it was stored vertically, I cannot remember the orientation i.e. was it stored upside down or right side up.

Given the potential damage here, this isnt just going to be a case of cleaning up the obvious problems and calling it quits as I hoped it might be - I am going to have to open this up and take a look at what is going on. The first thing I will do here though is clean up the cosmetic damage on the battery compartment doors.
The best way to deal with leaks and the stains they make like this is to use white vinegar. Just a cotton bud soaked in vinegar with some slight pressure and carefully start removing the stains. It should clean up pretty quickly and with little effort. You can use isopropyl alcohol to do this as well, however it will require more effort to get the stains up. If you use vinegar, you are going to want to clean the surfaces you have worked on when you are done, otherwise your device will smell like vinegar. Also, its an acid, so you dont really want it hanging around on the plastics of your device for no reason.
Getting into the Game Gear is relatively easy if you have the correct tools. The majority of the screws can be removed with a PH00 bit. However, there is one odd one out inside the cartridge slot, thankfully this can be opened up with a 4.5 security star bit - the same type of bit used in Nintendo consoles and cartridges. If you dont have one of these, you can pick them up really easily on Ebay or Amazon.


With all the screws removed, you will be able to open up the case, be careful though - there are cables attaching the two sides together. There is also an RF shield in there that hinges over a round piece of plastic. Both of these things need to be in mind when you are taking apart the case and putting it back together. For my purposes, I am going to disconnect the cables to make it easier to see what is going on.

Doing so was a good idea, I can see some of the battery leakage has gotten down to the one of the board connectors and some of the EXT port. However, this seems to be the extent of the damage so far on this half of the device.

We also get a chance to see how handhelds were backlit in those days. In this shot, we can see the cartridge slot and integrated heatsink in the middle of the board, above that is another shield with a high voltage warning. Under here is a literal light bulb - a fluorescent tube to be exact. The sort of thing you used to get in your kitchen or in an office. This is what would provide the backlight for the screen and the reason why these early handhelds would eat your batteries. This is also the reason why these devices would get hot if you used them for too long. I dont know much about displays from back in those days, so I have zero clue as to whether you could get a colour screen that lit itself in the way you can now. If you could, I would imagine that it would have pushed the price up a lot. This is the same way the Lynx was backlit as well. Everything else looks pretty clean in here, so all I need to do is clean up that connector with some vinegar.
After some work with a cotton wool bud and a cheap toothbrush, most of the marks from the connector have been removed. Thankfully, there doesnt seem to be any sign of corrosion in the connector itself - but even if there had been and the connector was completely ruined, this is something we could have replaced from the parts we have in the works shop. So for now, we can set this part to one side and get cracking on what I think is the badly damaged half.

This is the area I am most concerned about, it seems like the device was stored vertically upside down. To start cleaning this part up, I need to remove it from the case itself, to do this I need to remove the RF shield first, then extract the damaged board. According to the Game Gear Service manual, this is the amplifier board. This is responsible for providing all sound operations for the device itself, for the speakers and for the headphones. Right now, I know that this is the only piece of circuitry that is damaged, so if it doesnt work after cleaning, I can simply replace it with the same part from another Game Gear.

This is a close up of the headphone socket showing the corrosion. Looking directly down the connector, it seems like the interior is clean, so we might be lucky here, a good squirt of contact cleaner in here should be enough to deal with any gunk that may be lodge in there.


However things look a lot worse when it comes to the volume wheel. Here you can see that there is a rather large amount of corrosion, it appears to have built up between the board and the potentiometer itself, to such an extent that the volume wheel seems to be pulling away from the board. We can also see quite a lot of corrosion around the component marked L1. According to the Game Gear service manual, this is a line filter, but looking at the symbol used for it, it is basically an inductor.

After giving everything a clean with some vinegar and a toothbrush, we have most of the corrosion away from the board itself. The only thing that still looks like a problem is the volume wheel. Whilst I was able to get a lot of the corrosion away from it, there still seems to be a lot underneath. I gave it a blast of Deoxit spray, but this didn't seem to do anything visibly. I think the only way to get any further with getting rid of the corrosion here would be to take the wheel off the board and remove it this way


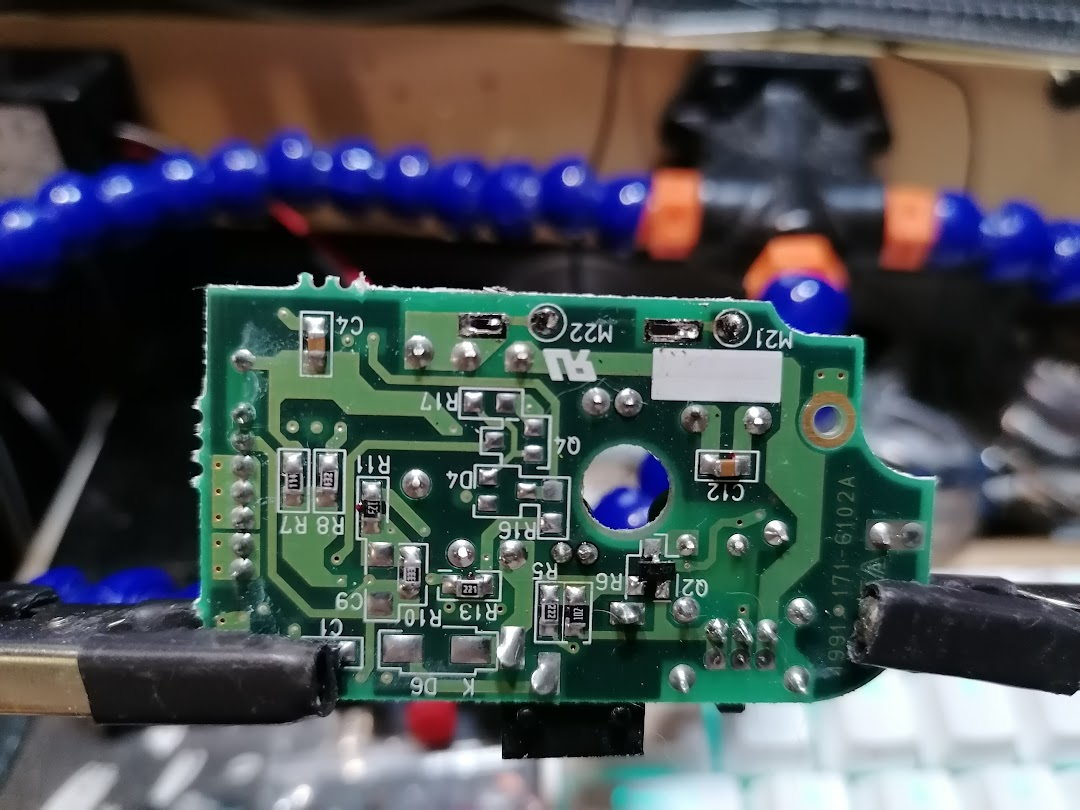
Now, this leaves us with the problem I initial started this job for, the battery terminals. The corroded ones need to be removed and replaced. Doing this is fairly easy, however this is why the title of this article is "part 1" as I will need to order some replacements to complete the job. Most of the damaged terminals can simply be pulled out of the case, however one set of them are soldered directly to what looks like the power supply board. Looking at the service manual, I believe this to be what is called the DC - DC converter circuit board. It has a sticky shield that helps keep it in place, in my good Game Gear, this is also where the foam I mentioned earlier should be found - and I am glad this piece is here. If it wasnt, then there would be a very good chance I would be cleaning corrosion away from a lot more that the places I have been working on so far. To replace the terminals, the whole board needs to come out, this means removing the two retaining screws and carefully easing the black shield from the case. There is no other sign of corrosion on the board itself, so I dont need to get in there with anything to clean it. However I do need to desolder the terminals and remove that shield.

The tabs that seem to hold the battery terminals in place are marked M21 and M22. From looking at how the black shield that formally held the foam in place is fixed to them, it makes more sense to remove them first and then separate them from the shield.
You only need to remove the solder on the horizontal joints, the round pads next to them seem to be just test pads, they dont hold the terminals into place. Thankfully, it doesnt require too much work with the soldering iron to get these parts out, but a solder pump will make this job a lot easier. You could try some solder wick, but I have never had much luck with that in places like this.
Once removed, you will be left with a lovely, gunky shield to which the battery terminals are adhered to. I had hoped that a liberal wash with some IPA would remove all the gunk from the shield, but it refused to move. This is a testament to the level of engineering that went into these devices - capacitors that are designed to fail (another story...) and foam that will deteriorate.

To get the gunk off, I ended up having to use a hobby knife to carefully scrape it away, I want to keep the shield intact if I can - its there for a reason. You can use the hobby knife to carefully to get in behind the battery terminals and carefully remove them from the shield. Once that is done, you are free to give it a really good clean. One thing to note here is that IPA wasnt very helpful in cleaning this up, instead I had to use some dedicated sticker remover to really make a difference, I guess Sega really put a lot of effort into making this stuff sticky as opposed to lasting for decades? But then again, how long did anyone really expect an 8-bit handheld from the start of the 90's to be that popular?


Which brings us to the stunning conclusion of this article. I have achieved everything I didn't know I needed to do, but ultimately not the one thing I set out to do, which was clean up those battery terminals. Instead, I now plan to buy in some replacement terminals and replace them before putting the whole thing back together and checking to see if it works or not. To be honest, right now I am not entirely convinced that the amplifier/sound board is going to work. Whilst I was able to remove a lot of the corrosion from the volume wheel, I just dont like the look of it. So I am mentally preparing myself to replace this entire unit as well.
I have also taken a good look at all the capacitors on the rest of the boards, whilst I cant see any that look like they need replacing, there is one thing that most people who know what they are doing with the Game Gear say - you will always need to replace the capacitors. Probably the best thing to do here is to take my component tester and see if I can test some of these in situ to see if they are still in good working order. If they are not, then it may be a good idea to get them replaced whilst I have this thing open...
